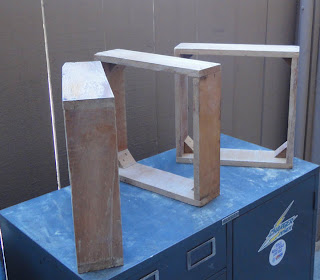
I know I haven’t been posting much, but I have been DOING! Yay doing (boo, not posting). I tackled the awesome wooden squares that I decided should be wall cubes that I found in the dumpster and have been “decorating” my porch.
See? Anyway, I felt that if I just gave them a little love, they’d love me back.
“What kind of love?,” you ask? “This isn’t going somewhere disturbing, is it?" Ye of little faith.
I’ll show you, in this TOTALLY safe-for-work (unless they don’t like you not working, in which case you should probably come back later), completely G-rated (well, ish, no promises on not swearing), step-by-step tutorial on restoring unfinished, unloved wood. In this case, in the form of future decorative shelving.
Disclaimer: Do not use this tutorial to restore heirloom furniture or anything you’re REALLY attached to. I’m Google-ing this shit and making stuff up as I go along just like everyone else. I share so you can see what worked, but no guarantees, ok? Talk to a professional before putting nail polish remover on your grandmother’s credenza.
Ok? Ok. Onward.
- Cover yo’ face, fool! You’re gonna sand, and sanding creates dust, and dust is not good for
a. Your lungs
or
b. Your eyes - Assemble your team. In this case, it was a paint-scraper (there was gum AND paint on these bad boys), a cheap synthetic paint brush, fine-grit sand-paper (I used 220, but you really don’t HAVE to go quite that fine), some wood-conditioning stain from IKEA, MinWax Tung Oil for varnish and moisturizing nail polish remover (not pictured).
- Remove extraneous crap from wood. This involved scraping off the gum (gross) and using nail polish remover to get rid of the random red paint on these things. I didn’t really expect it to work, but it did, fairly well, so that was cool. I did need to sand some of the paint off, tho, it was stuck on there pretty good, and there was a lot of it.
- Moving on, sand the whole mess. All the sides, the corners, the crevasses: get to know your wood. Also always sand with the grain. If you know what this means, please tell me. I sanded the way that the wood lines go, except where it was too hard to do that, then I threw caution to the wind and sanded however the hell I could sand. You do your thing, I’ll do mine, but remember, this isn’t heirloom-wood restoration. Talk to a pro about that.
- Follow the directions on your wood stain. Mostly it’s paint, let dry, and rub with clean, dry cloth. But if yours is different, go with what it says.
- Finish with your Tung Oil. Follow the directions, but basically it’s paint, let dry for 15 minutes, then polish with a clean, dry cloth that you’re willing to throw out afterwards. That shit does not come out of fabric. (I sort of forgot that I was taking pictures at this point. Tung Oil Finish is STICKY).
- Repeat the Tung Oil step if it’s not shiny enough. I went with 2 coats, but you have to let it dry overnight between coats, so that’s only for people who are very good at waiting, like myself.
 |
| No, it's not a DIY episode of Dexter. |
Now I’ve just got to hang these bad boys on the wall! (The hubs keeps the drill at work because he’s an engineer, so I have to wait for him to bring it home. “He” may be getting a new, at-home drill for his birthday. Is that really selfish? I might be a bad wife.) They’re going to go with my WW-II inspired kitchen/dining room (more on that later)!
Have a lovely day!


No comments:
Post a Comment